Documentation
Welcome to the Py-Engineering documentation. If you're new to these docs, we recommend you to check what Py-Engineering is all about. Watch the introduction movie "How it works" and checkout some examples. If you think anything is missing or unclear, let us know. Ready to start, but no Py-Engineering account yet? Request a demo!
Getting started
No need to install anything. Py-Engineering is a web-application. You only need an account and/or an API key. If you don’t have one, reach out to someone in your company who can provide you one or request a demo by mailing to info@py-engineering.com.
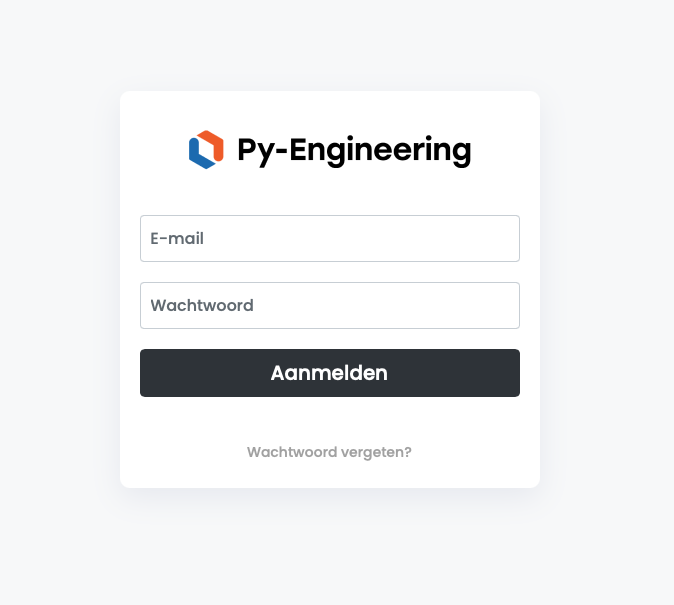
Example of a login page on py-engineering.com. Depending on the platform your account belongs to, this login page might have a different URL and look-and-feel.
How it works
The general concept is that you write a Python function that prints output like you would do on your local machine. By defining input variables in Py-Engineering.com, this function is instantly accessible as web-app or API. By running the tool in the web-app or trough the API, the Python function is executed in our cloud environment. See what this looks like in the introduction video below or check out the Tutorials.
Platform settings
Easily configure platform-wide options for a consistent user experience.
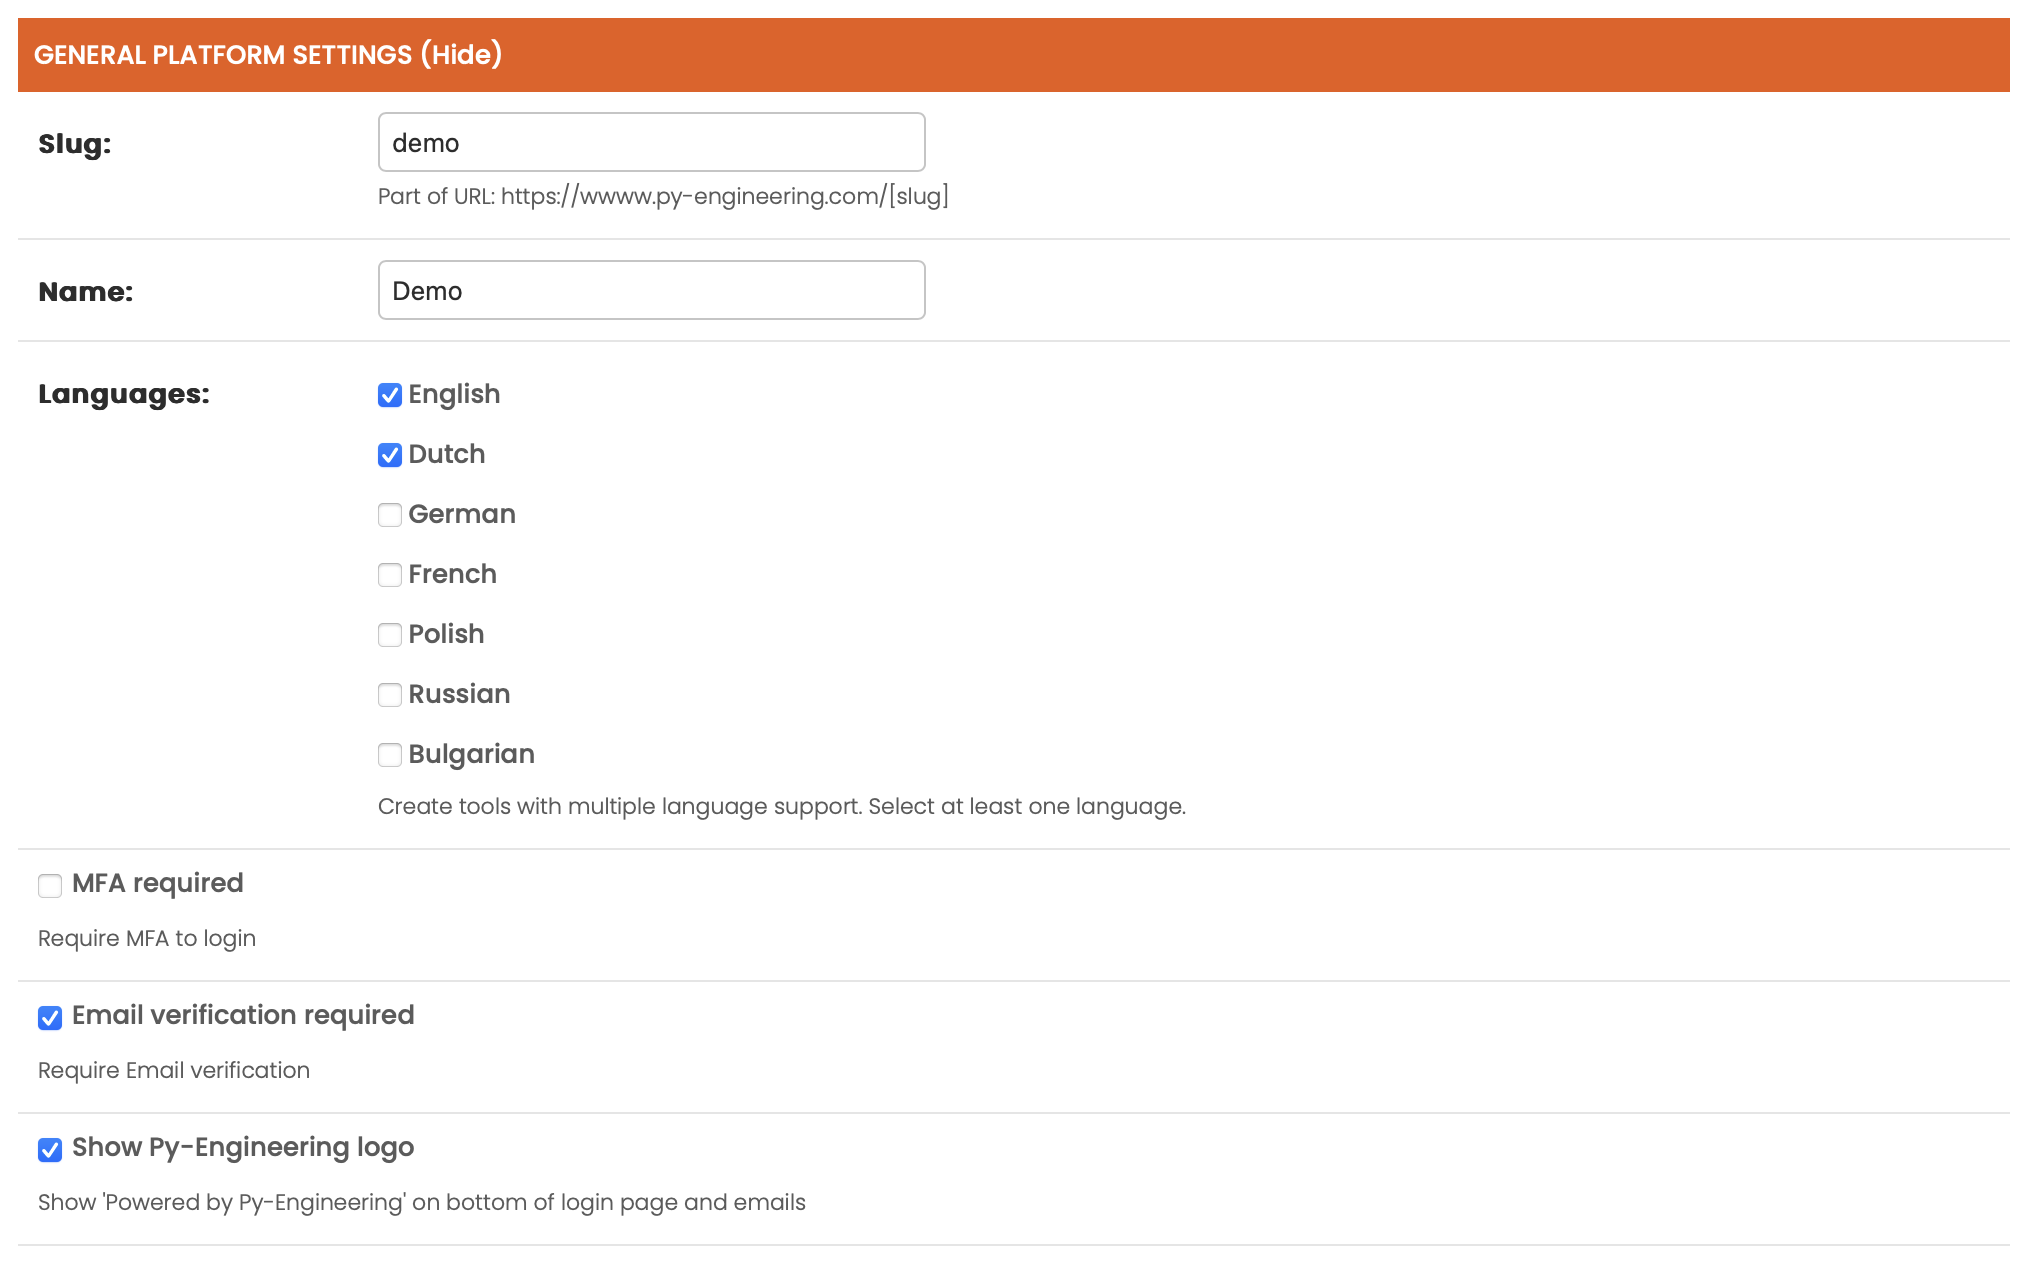
General platform settings
The slug defines the structure of the platform's URLs. It determines where the platform and its related pages can be accessed. For example, if the slug is set to demo, the following URLs will be used:
- Platform home page: https://py-engineering.com/demo
- Login page: https://py-engineering.com/demo/login
- Registration page (if platform is open for signup): https://py-engineering.com/platform_signup/demo
The Name of the platform is displayed on the home page if no logo is provided.
Created tools can support multiple languages based on the selected Languages.
For tools that require an account, Email verification and Multi-Factor Authentication (MFA) can be configured as mandatory.
By default, all platform pages display the Py-Engineering logo at the bottom. This can be disabled by setting Show Py-Engineering logo to false.
Lay out
The Primary color defines the main accent color of the platform, which is used for buttons, links, and other highlighted elements.
The Secondary color is used for complementary elements, such as backgrounds and less prominent UI components.
The Logo is displayed on the home page and throughout the platform. If no logo is provided, the platform name will be shown instead.

Signup
The Allow sign up option determines whether users can create an account on the platform. If disabled, only existing users can log in.
The Company name in signup form checkbox adds a field for users to enter their company name during registration.
The Phone number in signup form checkbox adds a field for users to provide their phone number when signing up.
You can also specify one or more email addresses to receive a notification whenever a new user registers. This is useful for administrators or account managers who want to stay informed about new sign-ups.
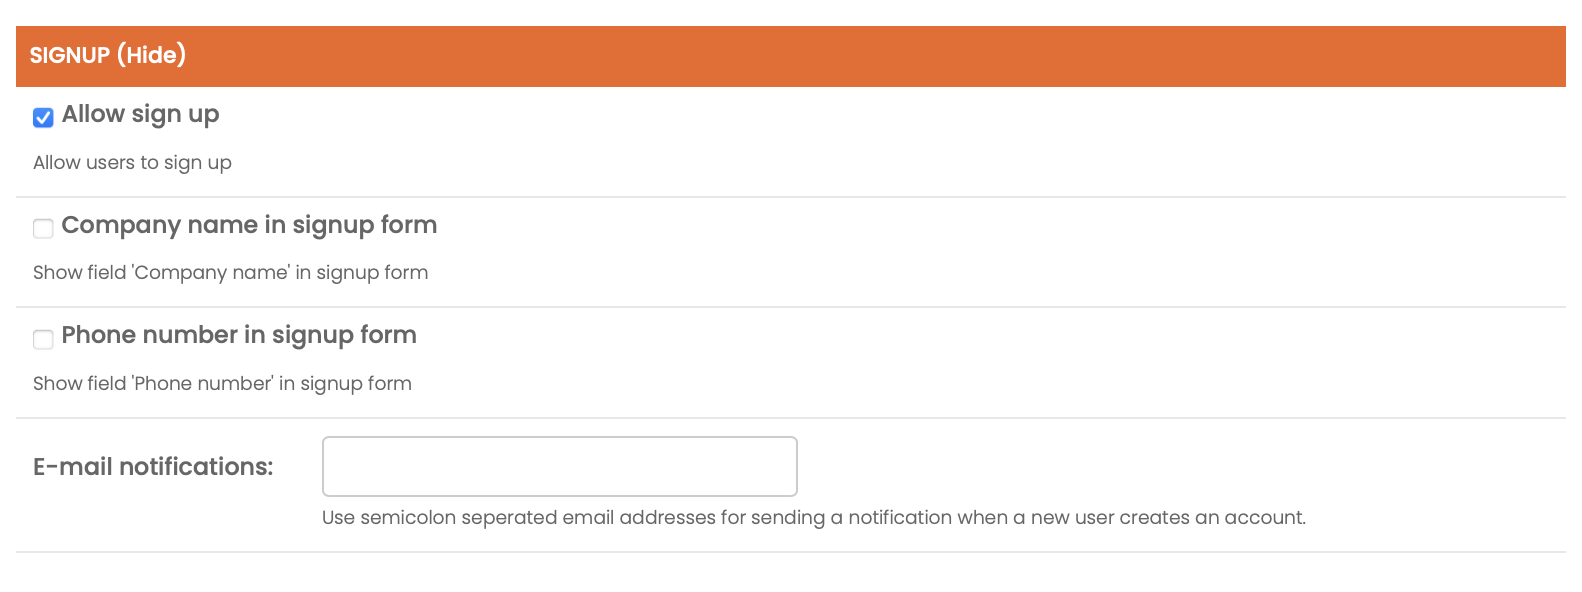
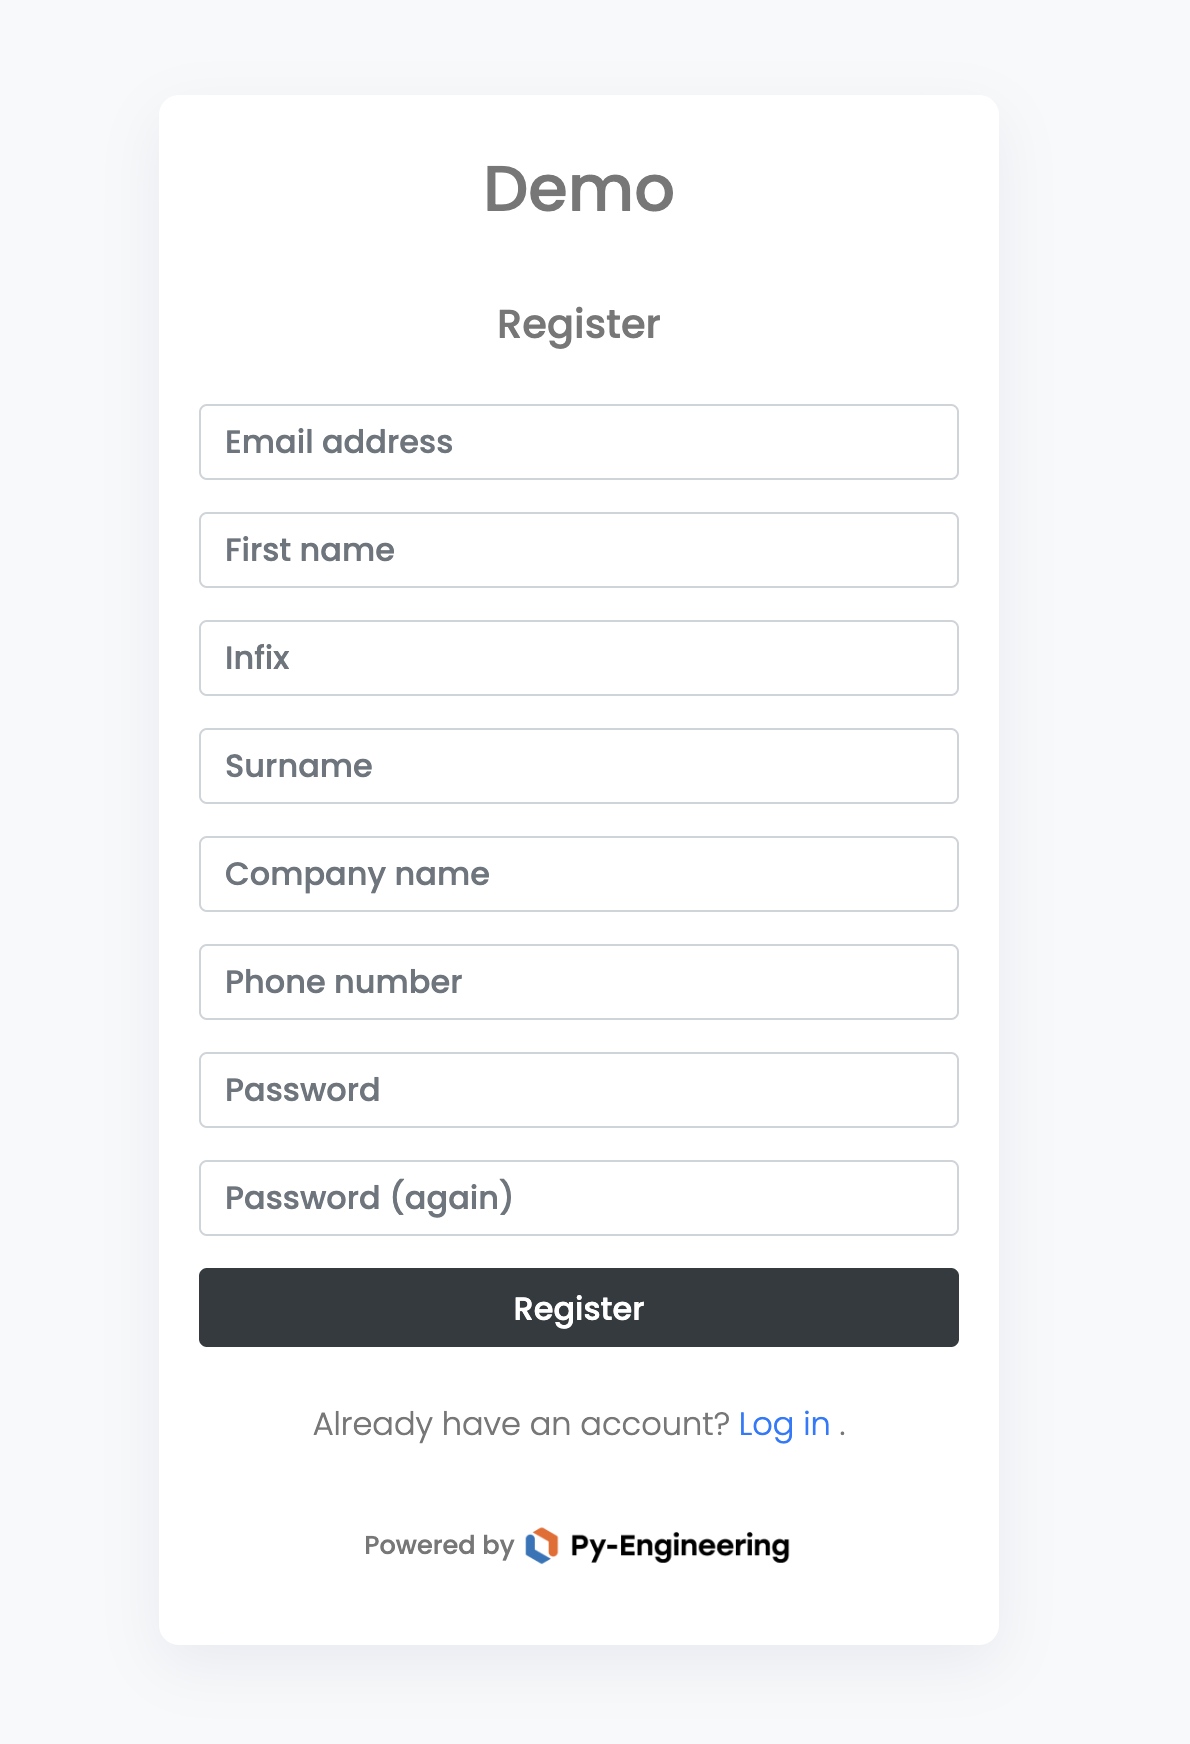
The image below shows a signup form with the Company Name and Phone Number fields enabled. When these options are selected, users are required to enter this information during registration.
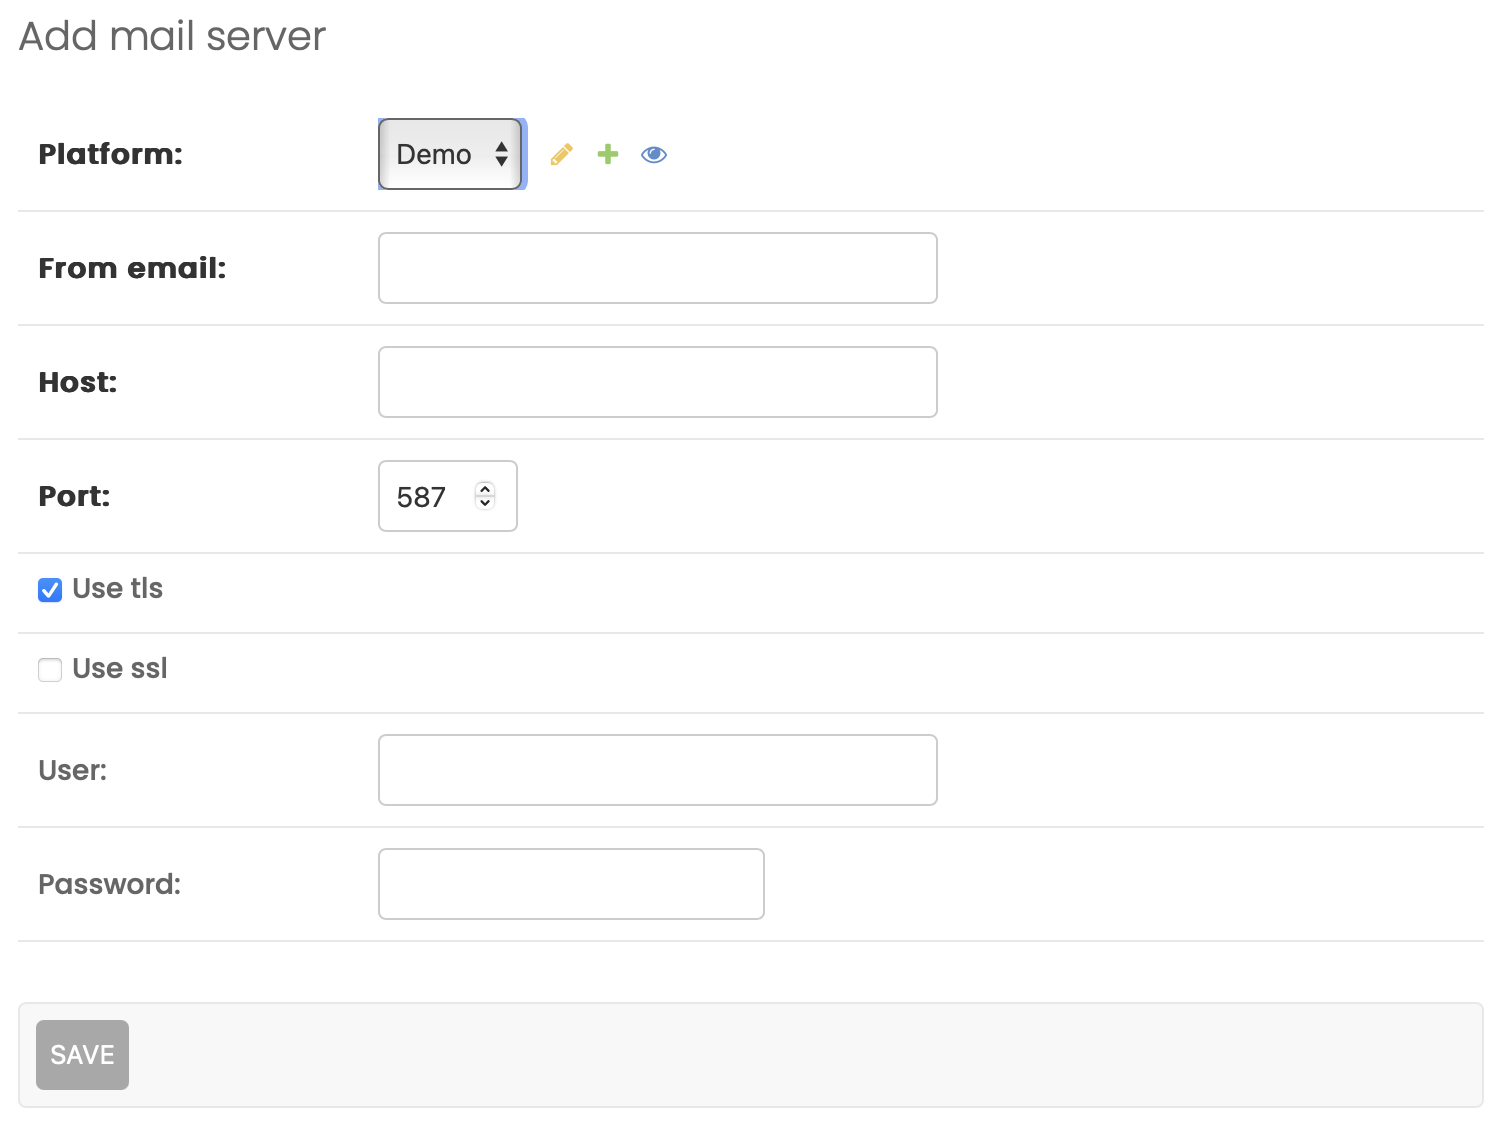
Connectivity
By default, emails are sent from noreply@py-engineering.com. If you wish to send emails from a different address, you can configure a Mail server.
The Domain setting allows the platform to be hosted on a custom domain instead of py-engineering.com. If a custom domain is used, a DNS server must be configured in coordination with the Py-Engineering developers.
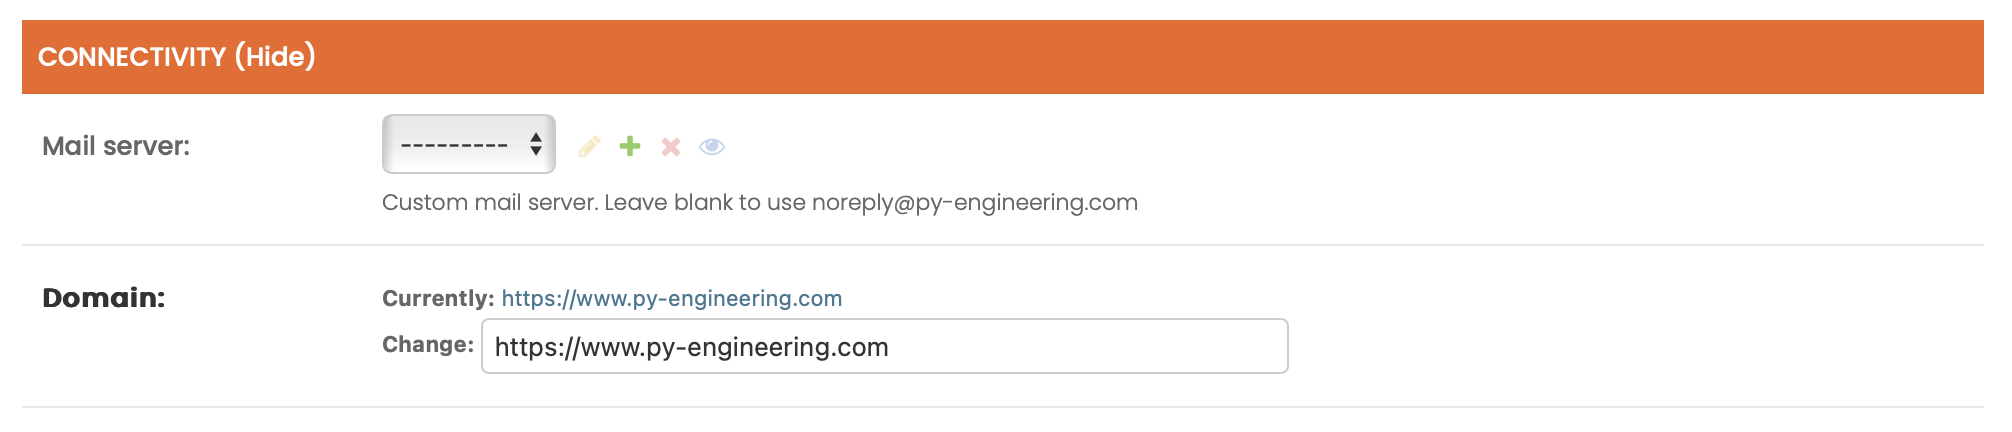
The SMTP settings can be configured via Platform > Mail server or by clicking the (+) directly
Tool settings
Define the behavior and properties of each tool directly within your Python scripts. Control how your tools are displayed and interacted with by users.
General tool settings
Slug defines the url of the tool. A tool can be found on the platform page https://py-engineering.com/demo/tool-a if slug is tool-a.
The Name of the platform is the name as shown on the tool page.
If multliple Languages are selected, multilanguage support becomes active. After saving the page, fields such as Name are given multiple input elements for each selected language. In the GUI, a dropdown for the selected language is shown in the upper right menu.

Info Tabs
On the Py-Engineering platform, many tools include additional tabs alongside the Output tab. These are known as Info Tabs. They provide extra context, explanation, or even interactive visualizations to support the user in understanding the tool and its results.
What is an Info Tab?
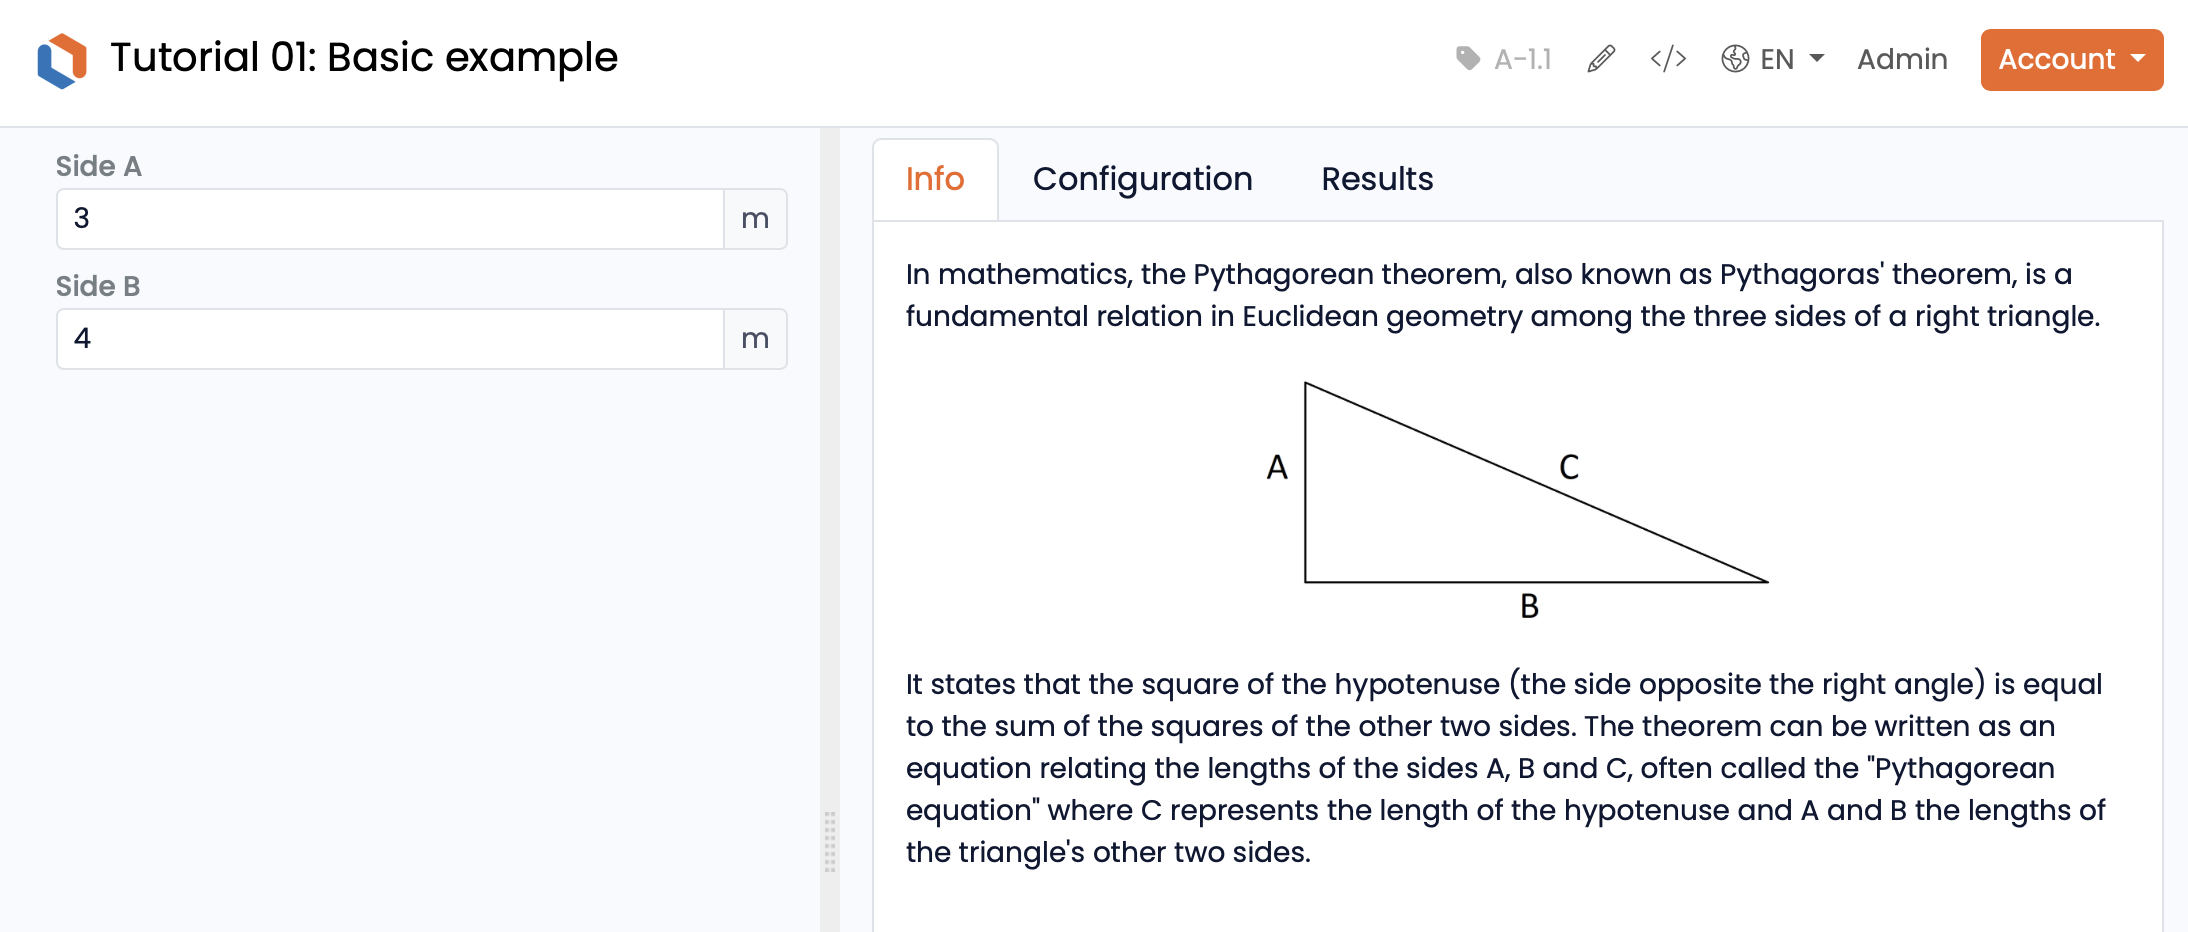
An Info Tab is an optional tab that appears within a tool interface. Info Tabs can contain:
- Background explanations
- References to standards or methods
- Visual aids
- Interactive 2D/3D content (such as embedded viewers)
- Interpretation guides for results
- They help users understand what a tool does, how it works, or how results should be used.
Where Info Tabs appear
If a tool includes Info Tabs, they will show up as separate tabs next to the Output tab. Some tools may include one Info Tab, others multiple. The order of these tabs is defined per tool.
Field overview when creating or editing an Info Tab
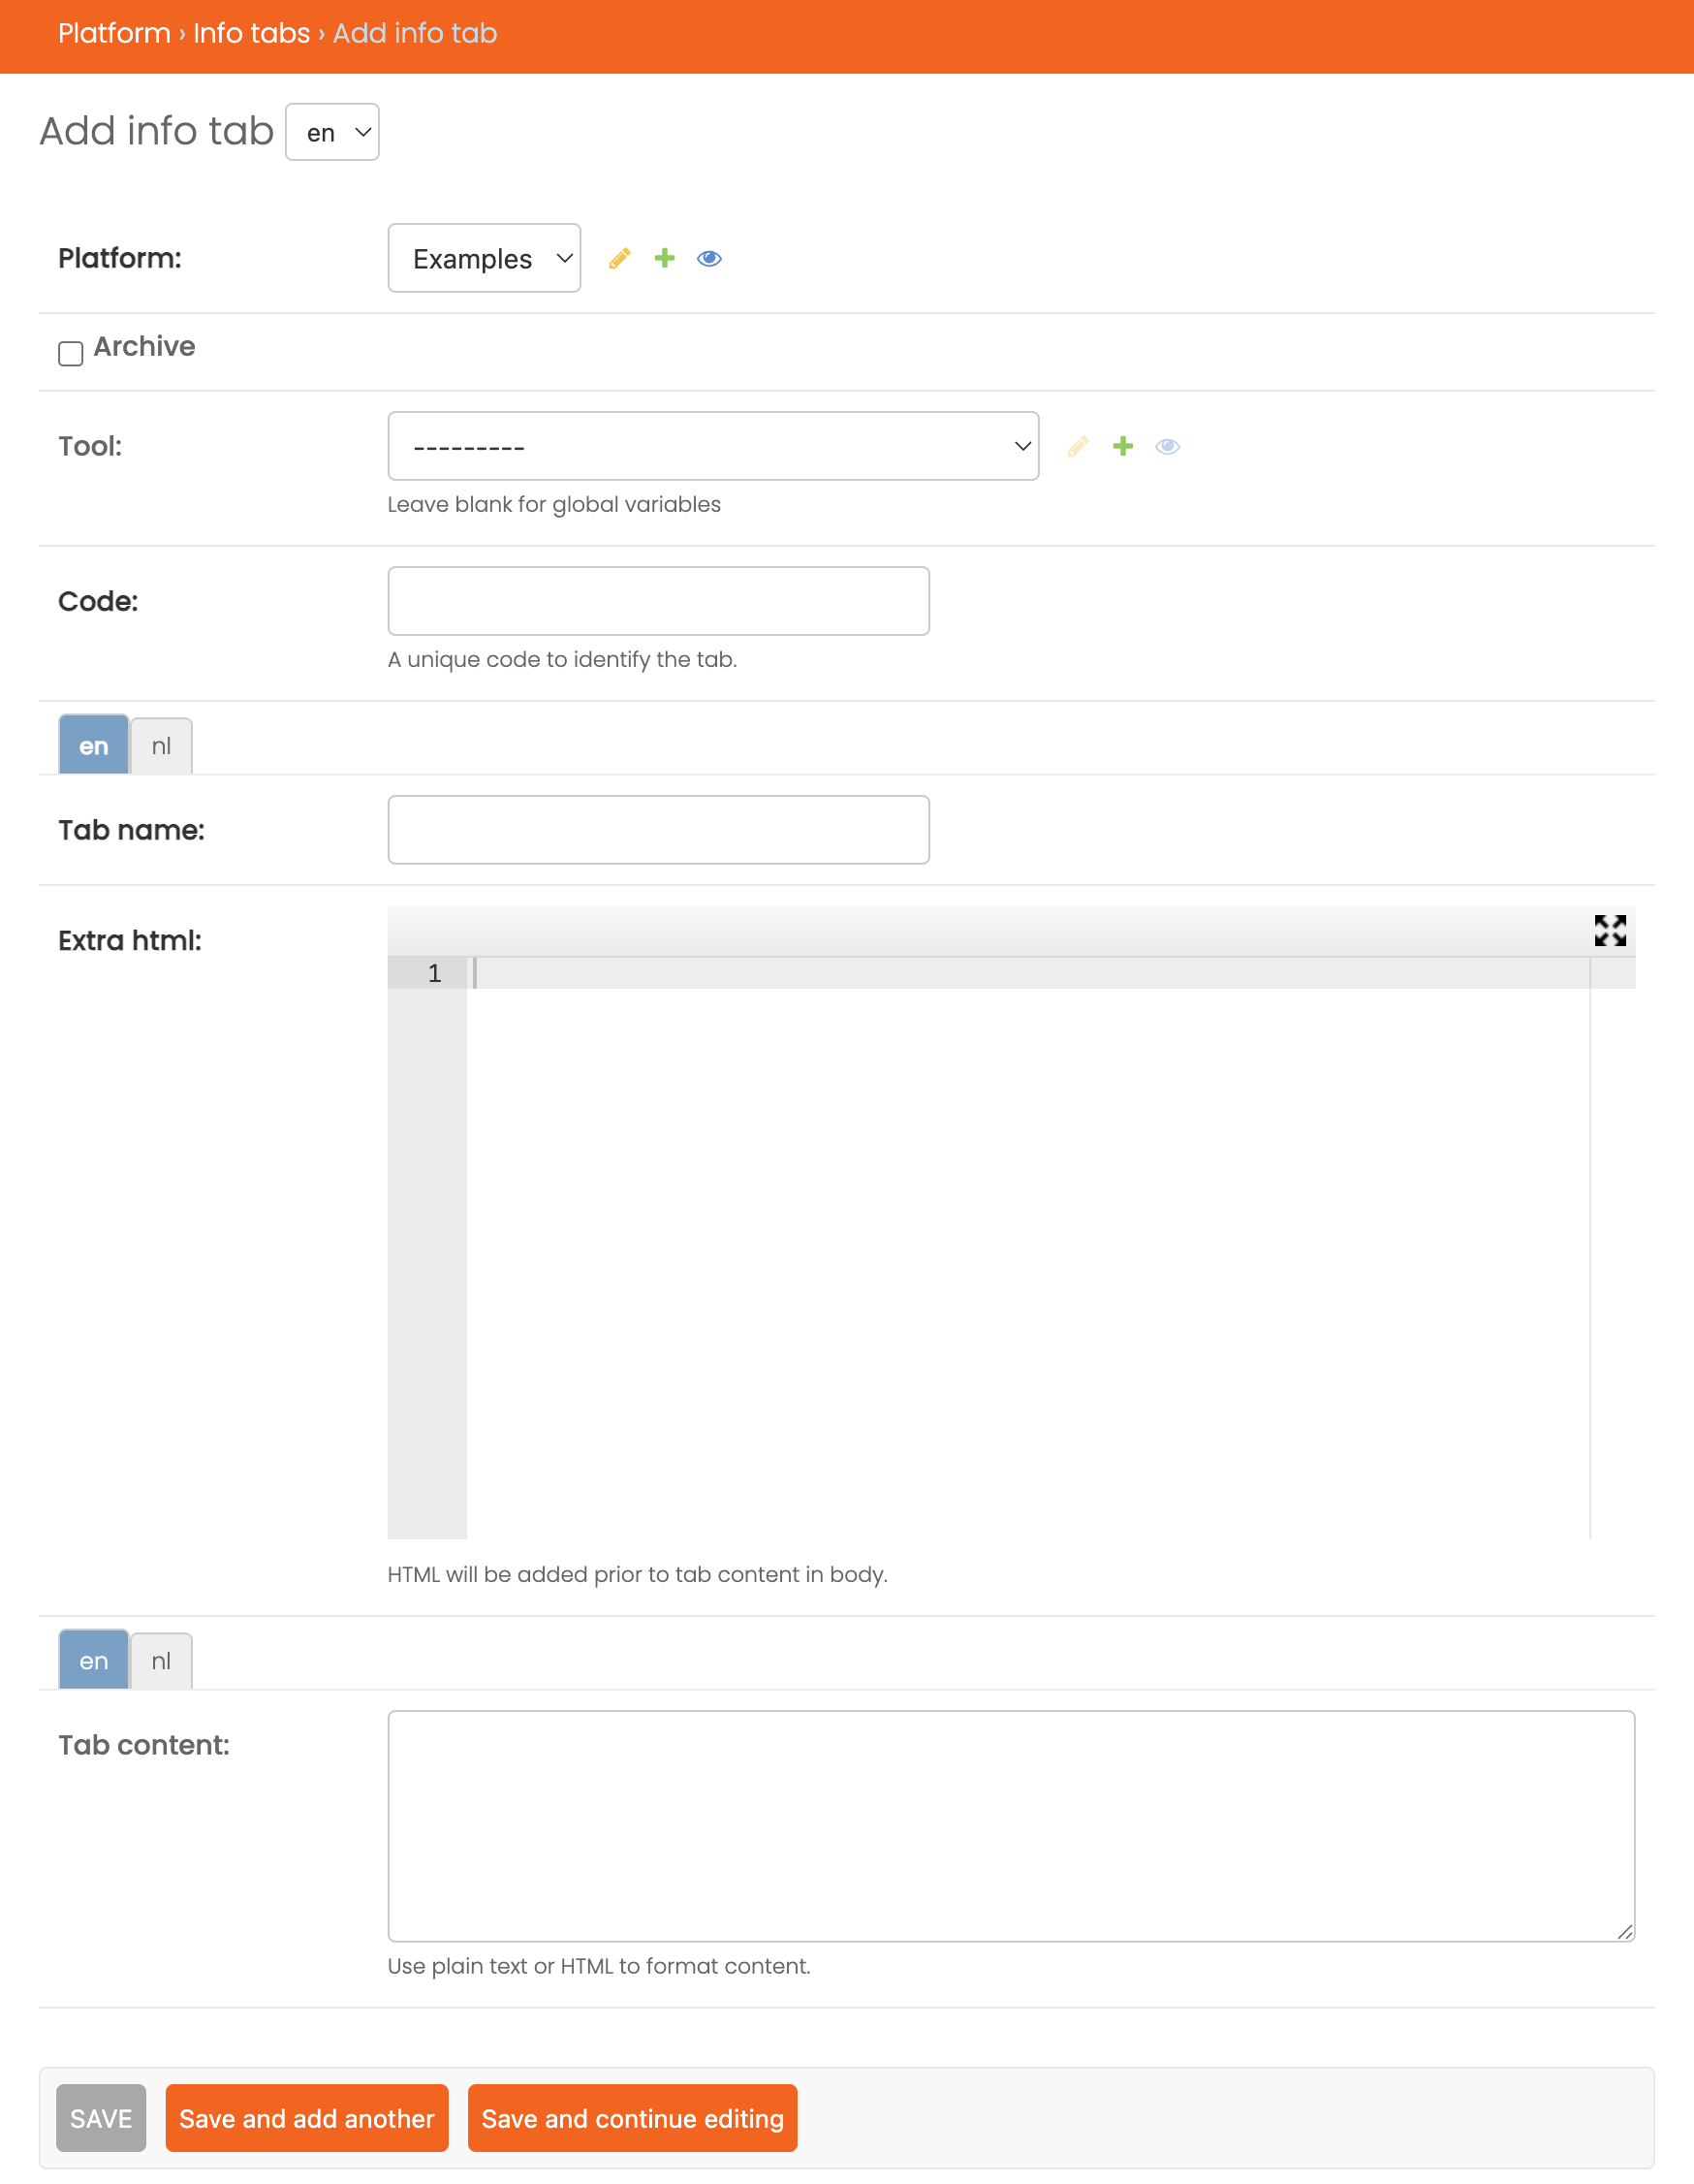
When you create or modify an Info Tab, you’ll encounter several fields:
Code: A unique internal identifier for the tab. This is used behind the scenes.Tab name: The label shown in the tab interface. This can be entered in multiple languages.Tab content: The main content of the tab, supporting rich text and multilingual input. This is where you explain the tab’s purpose or content.
Note: Some fields may be hidden depending on the selected platform or languages in use.
Info Tab ordering
When you assign Info Tabs to a tool, you can specify their order. This order determines how they are displayed in the tool interface — tabs with a lower order number appear earlier.
This ordering is set per tool, so the same Info Tab might appear in a different position in another tool.
Interactive viewers via extra html
Info Tabs can also be used for interactive content, such as 2D or 3D model viewers. To support this, you can provide custom HTML using the extra html field. For example:
- Embed a canvas with a 3D model using WebGL
- Render geometry with Three.js or other JavaScript libraries
- Display interactive SVGs or 2D plots
- This makes Info Tabs not just static explanation fields, but also a powerful space for user interaction and visual feedback.
Configuration
Tools can make use of Configuration Scripts. These scripts allow a tool to dynamically respond to changes in input fields by executing a Python script and displaying the result to the user.
This result is shown in a special type of Info Tab called the Configuration Tab. Whenever relevant input fields are modified, the Configuration Tab is (re)opened and updated automatically.
What is a Configuration Script?
A Configuration Script is a Python script that runs whenever specific inputs of a tool are changed. The script processes these inputs and returns an output that is rendered directly inside the Configuration Tab.
The returned output can be:
- Plain HTML (text, tables, formatted explanations)
- Interactive visualizations (e.g., Plotly charts)
- Images or diagrams dynamically generated from the inputs
This makes Configuration Scripts a flexible way to provide immediate, context-specific feedback to the user.
Field overview when creating or editing a Configuration Script
When setting up a Configuration Script for a tool, you will configure:
configuration_script: The Python code that will be executed when inputs change.
Below is a simple example of a Configuration Script.
It uses valuesaandbfrom the input fields and dynamically generates a rectangle using Plotly.
import plotly.graph_objects as go
import numpy as np
def configuration_function(input_dict):
    a = input_dict.get('a')
    b = input_dict.get('b')
    # Check input validity
    if a <= 0 or b <= 0:
        return
    # Create a triangle visualization
    fig = go.Figure(go.Scatter(
        x=[0, 0, b, 0],
        y=[0, a, 0, 0],
        fill="toself"
    ))
    fig.update_yaxes(scaleanchor="x", scaleratio=1)
    # Return the HTML representation of the Plotly figure
    print(fig.to_html(full_html=False, include_plotlyjs=False))
- Input parameters: The input fields whose changes trigger the script execution.

How it works:
The function configuration_function is automatically called whenever inputs a or b change.
If the inputs are valid, it generates a Plotly figure.
The figure is converted to HTML and displayed in the Configuration Tab.
This way, the user immediately sees a live preview of the configured geometry, without having to run the main calculation.
Behavior on input changes
Whenever one of the selected trigger fields is changed, the Configuration Script is executed and the result is immediately shown in the Configuration Tab.
Special note for select fields:
When using select inputs, a change event is also triggered when the default value is initially displayed. This means the Configuration Tab will open right away — even if the user has not actively changed anything.
If this is not desired, you can prevent the tab from opening by making the Configuration Script return nothing (None) when the default values are present. In that case:
- The Configuration Script is executed, but
- The Configuration Tab will not be updated or opened.
This gives you control over when the tab appears, ensuring it only shows up once it provides meaningful feedback.
Output
All statements printed by the main Python function are treated as output.
Output tags
To enhance the presentation, specific tags can be used to format the output. These tags begin with an underscore (_) and apply to the text either on the same line or across multiple lines enclosed within square brackets ([ ]).
| Tag | HTML Substitution |
|---|---|
| _BOLD | <b>{}</b> |
| _ITALIC | <i>{}</i> |
| _UNDERLINE | <u>{}</u> |
| _SUPERSCRIPT | <sup>{}</sup> |
| _SUBSCRIPT | <sub>{}</sub> |
| _CODE | <code>{}</code> |
| _PREFORMATTED | <pre>{}</pre> |
| _INFO | <p class="text-info my-1"><span class="fa fa-fw fa-info-circle"></span> {}</p> |
| _WARNING | <p class="text-warning my-1"><span class="fa fa-fw fa-exclamation-circle"></span> {}</p> |
| _DANGER | <p class="text-danger my-1"><span class="fa fa-fw fa-times-circle"></span> {}</p> |
| _SUCCESS | <p class="text-success my-1"><span class="fa fa-fw fa-check-circle"></span> {}</p> |
| _HEADER | <h6 class="pt-2">{}</h6> |
| _SMALL | <small>{}</small> |
| _HR | <hr>{} |
An example:
def main_function(input_dict):

    # Single line, starting a tag
    print('_HEADER Header')
    print('The rest of this line _UNDERLINE will be underlined on a new line.')
    for tag in ['INFO', 'WARNING', 'DANGER', 'SUCCESS']:
        print(f"_{tag} {tag.title()}")

    # Inline with [..]
    print('_BOLD[This] is bold and _ITALIC[this] is italic.')
    print('The tags _BOLD[_ITALIC[_UNDERLINE[can be combined]]]')

    # Multiple lines with [..]
    print('_PREFORMATTED[')
    print('Multiple lines')
    print('can be formatted')
    print('using brackets [ and _]')
    print('_SMALL Note that an endbracket within a tag needs to be escaped with a _CODE[ _ ]')
    print(']')
This will result in the following output on the tool page:

Create links and buttons
Just like output tags, the _IMAGE, _DOWNLOAD_LINK and _DOWNLOAD_BUTTON tags can be used to generate visually appealing links and buttons for files or URLs.
| Tag | HTML Substitution |
|---|---|
| _IMAGE | <img src="{file_url}" alt="{file_name}" class="img-fluid"><br> |
| _DOWNLOAD_LINK | <a href="{}">{}</a> |
| _DOWNLOAD_BUTTON | <a href="{}" class="btn btn-outline-secondary btn-sm"><span class="fa-fw fal fa fa-download"></span> {}</a><br> |
An example:
import xlsxwriter
import matplotlib.pyplot as plt
def main_function(input_dict):
file_name = 'example'
fig, ax = plt.subplots()
fruits = ['apple', 'blueberry', 'cherry', 'orange']
counts = [40, 100, 30, 55]
bar_labels = ['red', 'blue', '_red', 'orange']
bar_colors = ['tab:red', 'tab:blue', 'tab:red', 'tab:orange']
ax.bar(fruits, counts, label=bar_labels, color=bar_colors)
ax.set_ylabel('fruit supply')
ax.set_title('Fruit supply by kind and color')
ax.legend(title='Fruit color')
plt.savefig(file_name)
workbook = xlsxwriter.Workbook(file_name)
worksheet = workbook.add_worksheet()
worksheet.write('A1', 'Hello world')
workbook.close()
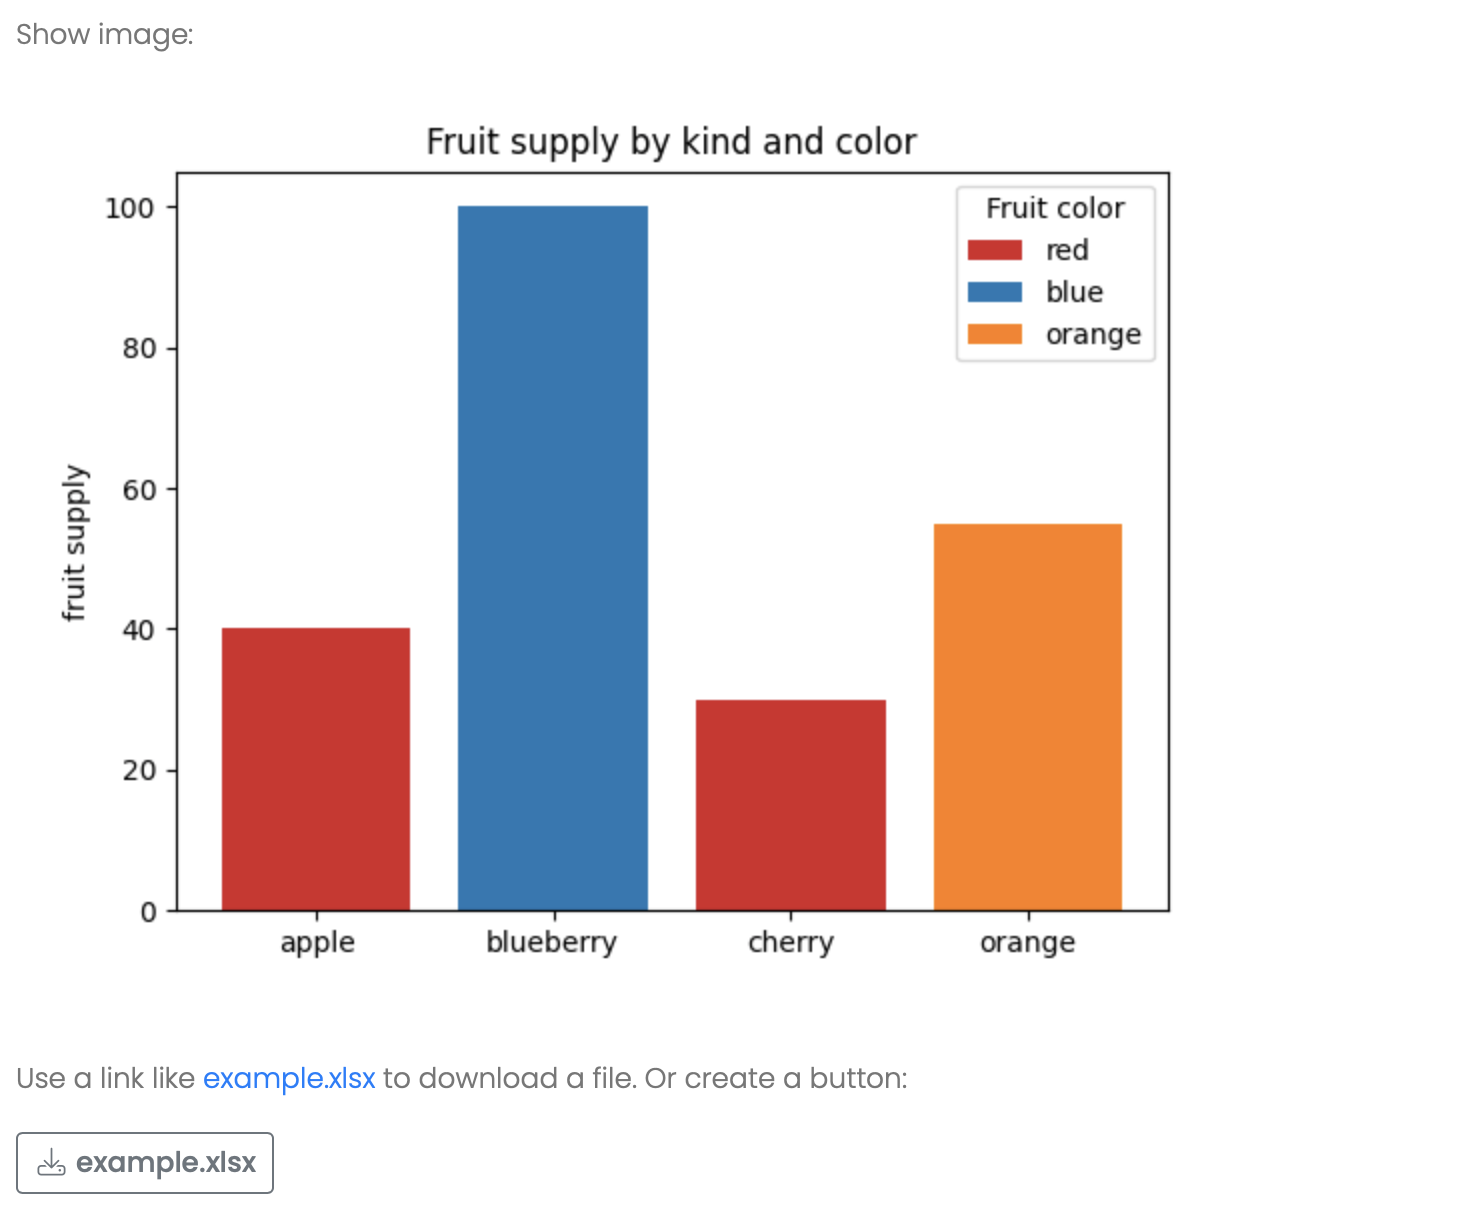
print("Show image:")
print(f"_IMAGE[{file_name}.png]")
print(f"Use a link like _DOWNLOAD_LINK[{file_name}.xlsx] to download a file. Or create a button:")
print(f"\n_DOWNLOAD_BUTTON[{file_name}.xlsx]")This will provide the following image, link and download button:
E-mail notifications
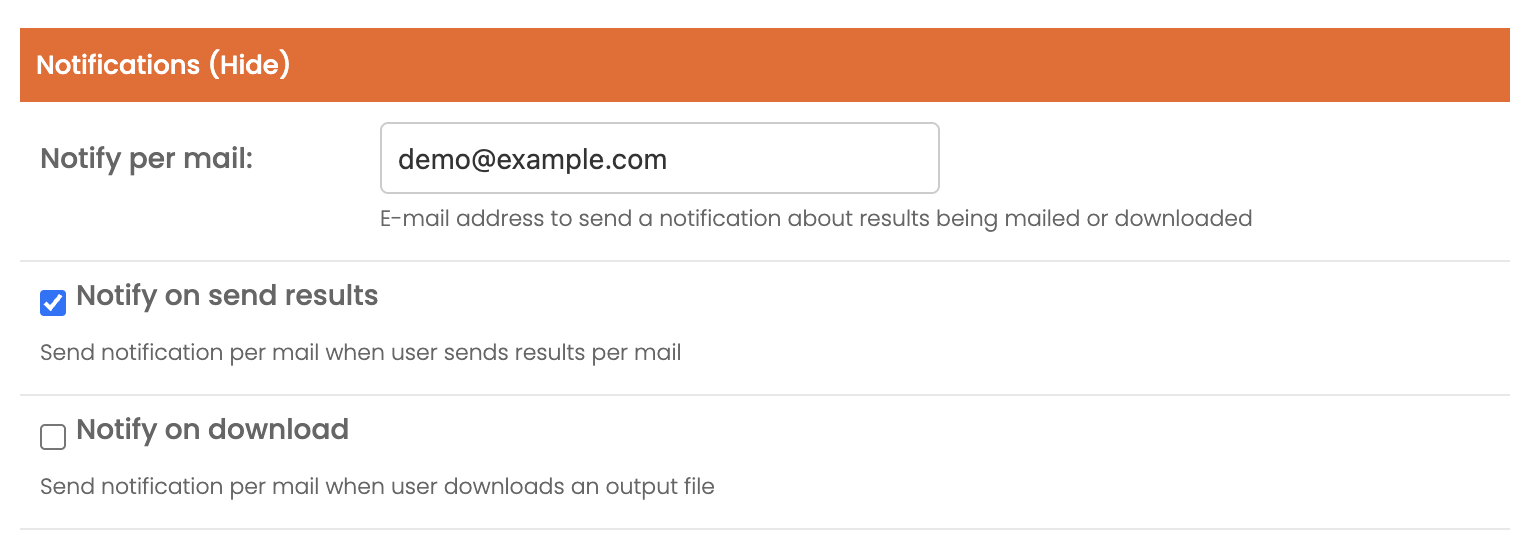
Py-Engineering provides the ability to configure email notifications for various user actions, which can be useful for marketing or usage tracking purposes.
To enable notifications, enter the desired recipient email address in the notify_per_mail field. This address will receive notifications based on the following boolean settings:
notify_on_download: When set toTrue, an email notification will be sent whenever a user downloads a generated PDF file.notify_on_send_results: When set toTrue, an email notification will be sent whenever the user chooses to send the calculation results via email.
These options allow for flexible tracking of user engagement with generated outputs.
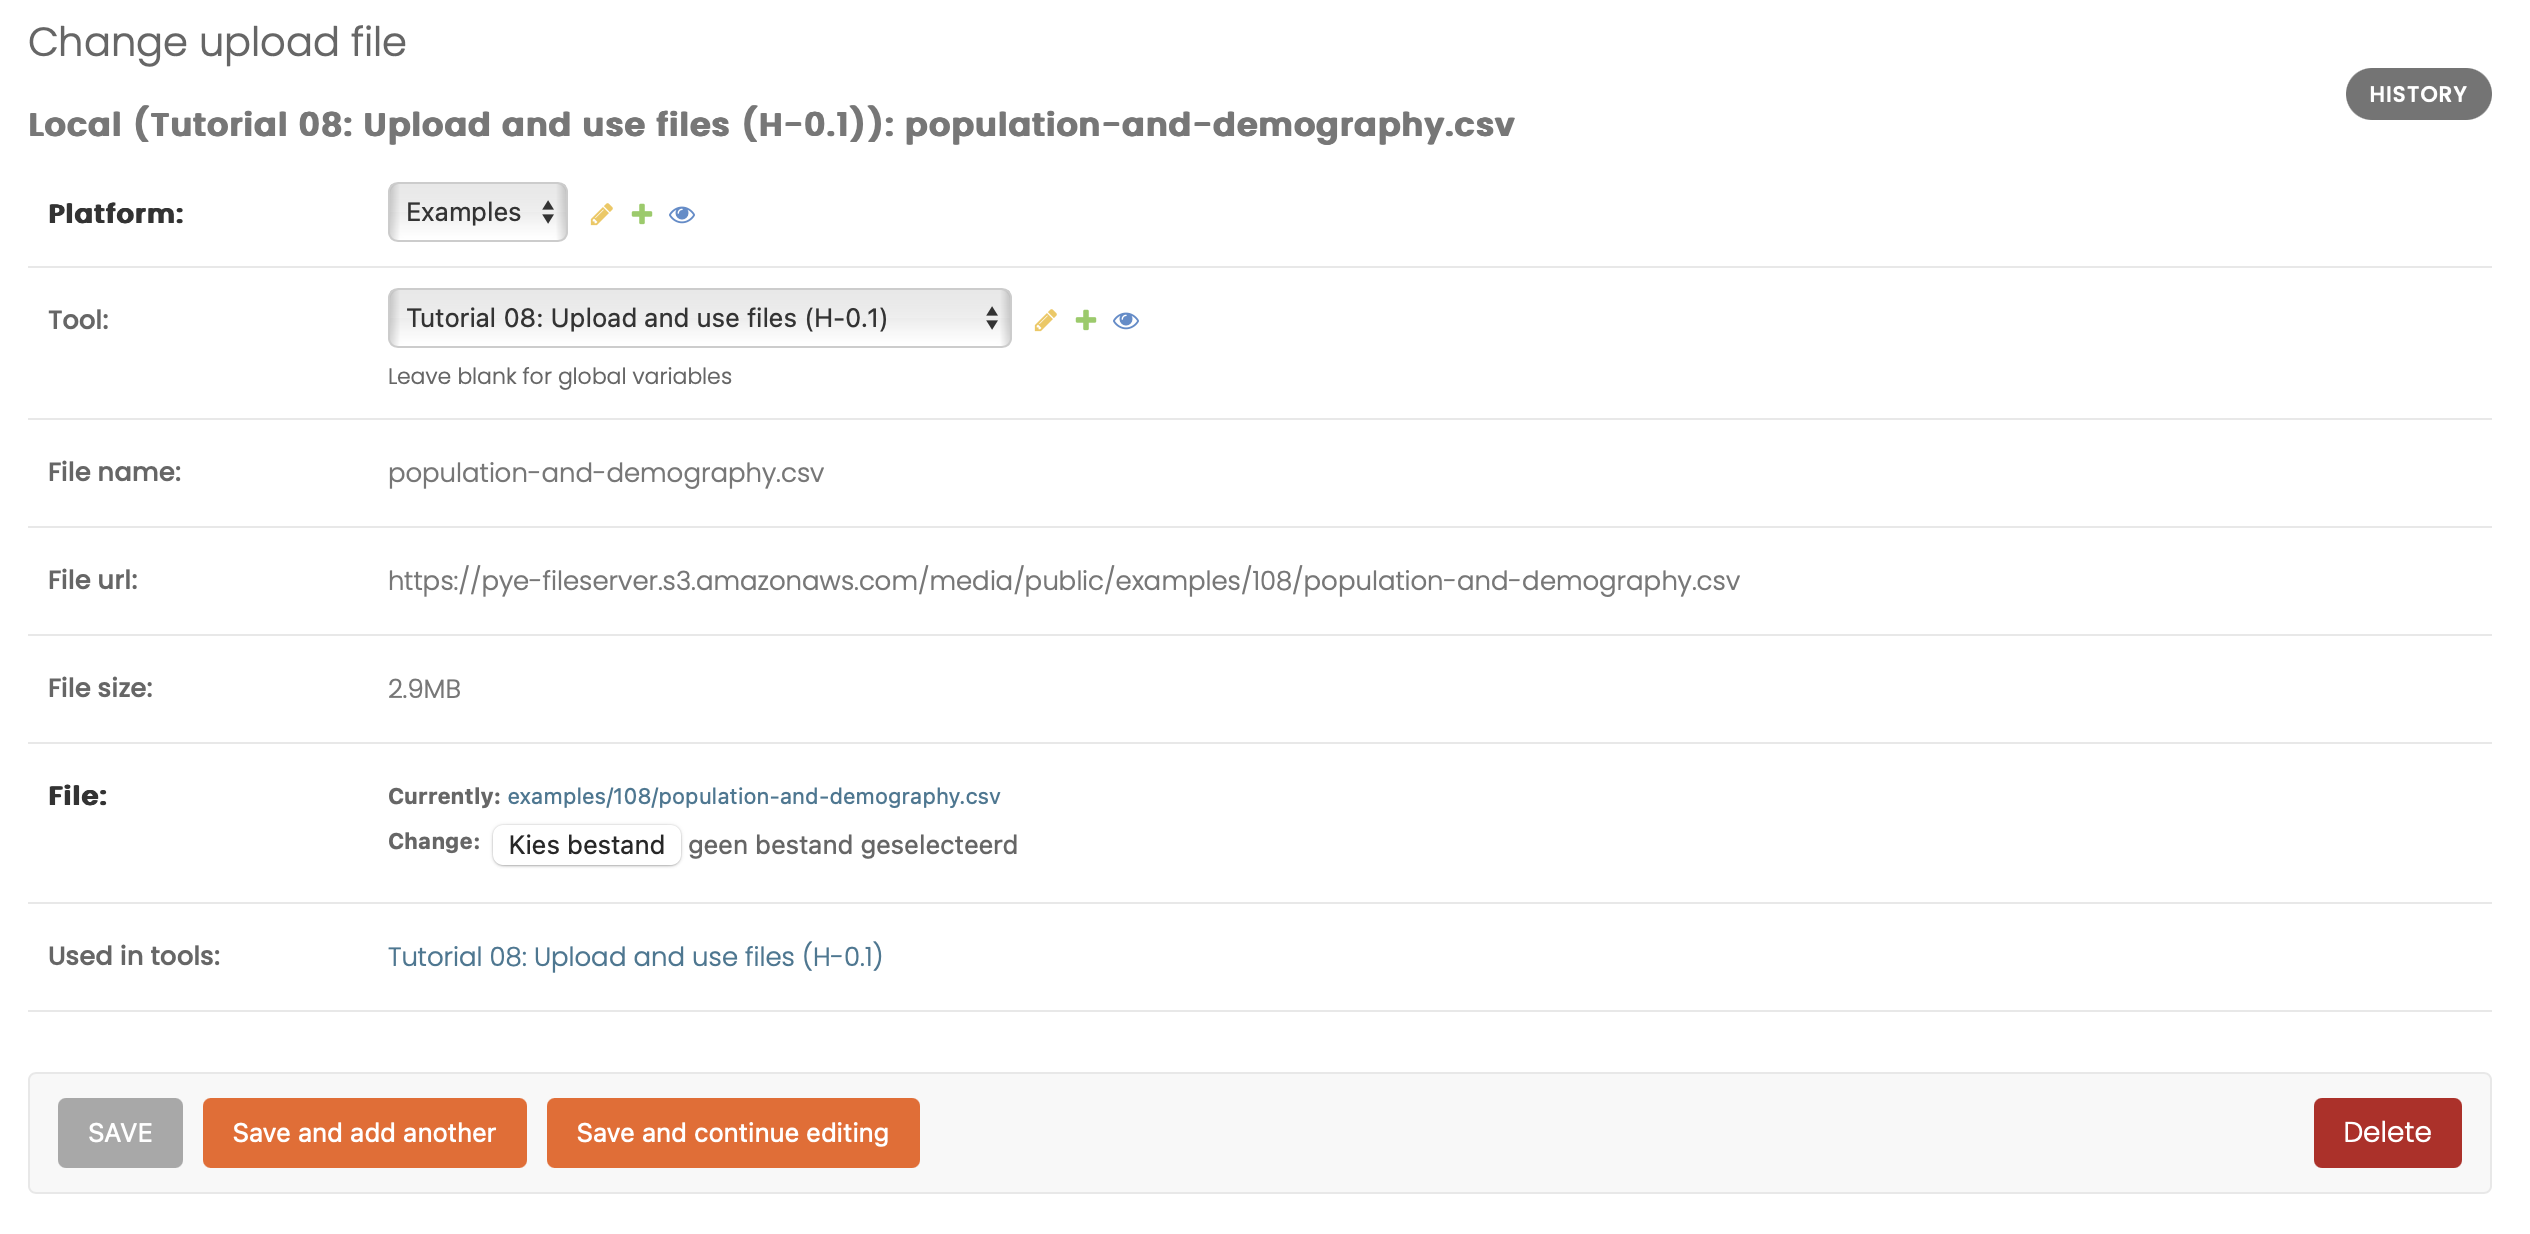
Upload data
Upload files like TXT, CSV or XLSX that can be used in one or more tools.
Sharing
Control access and share your tools with just a few clicks.
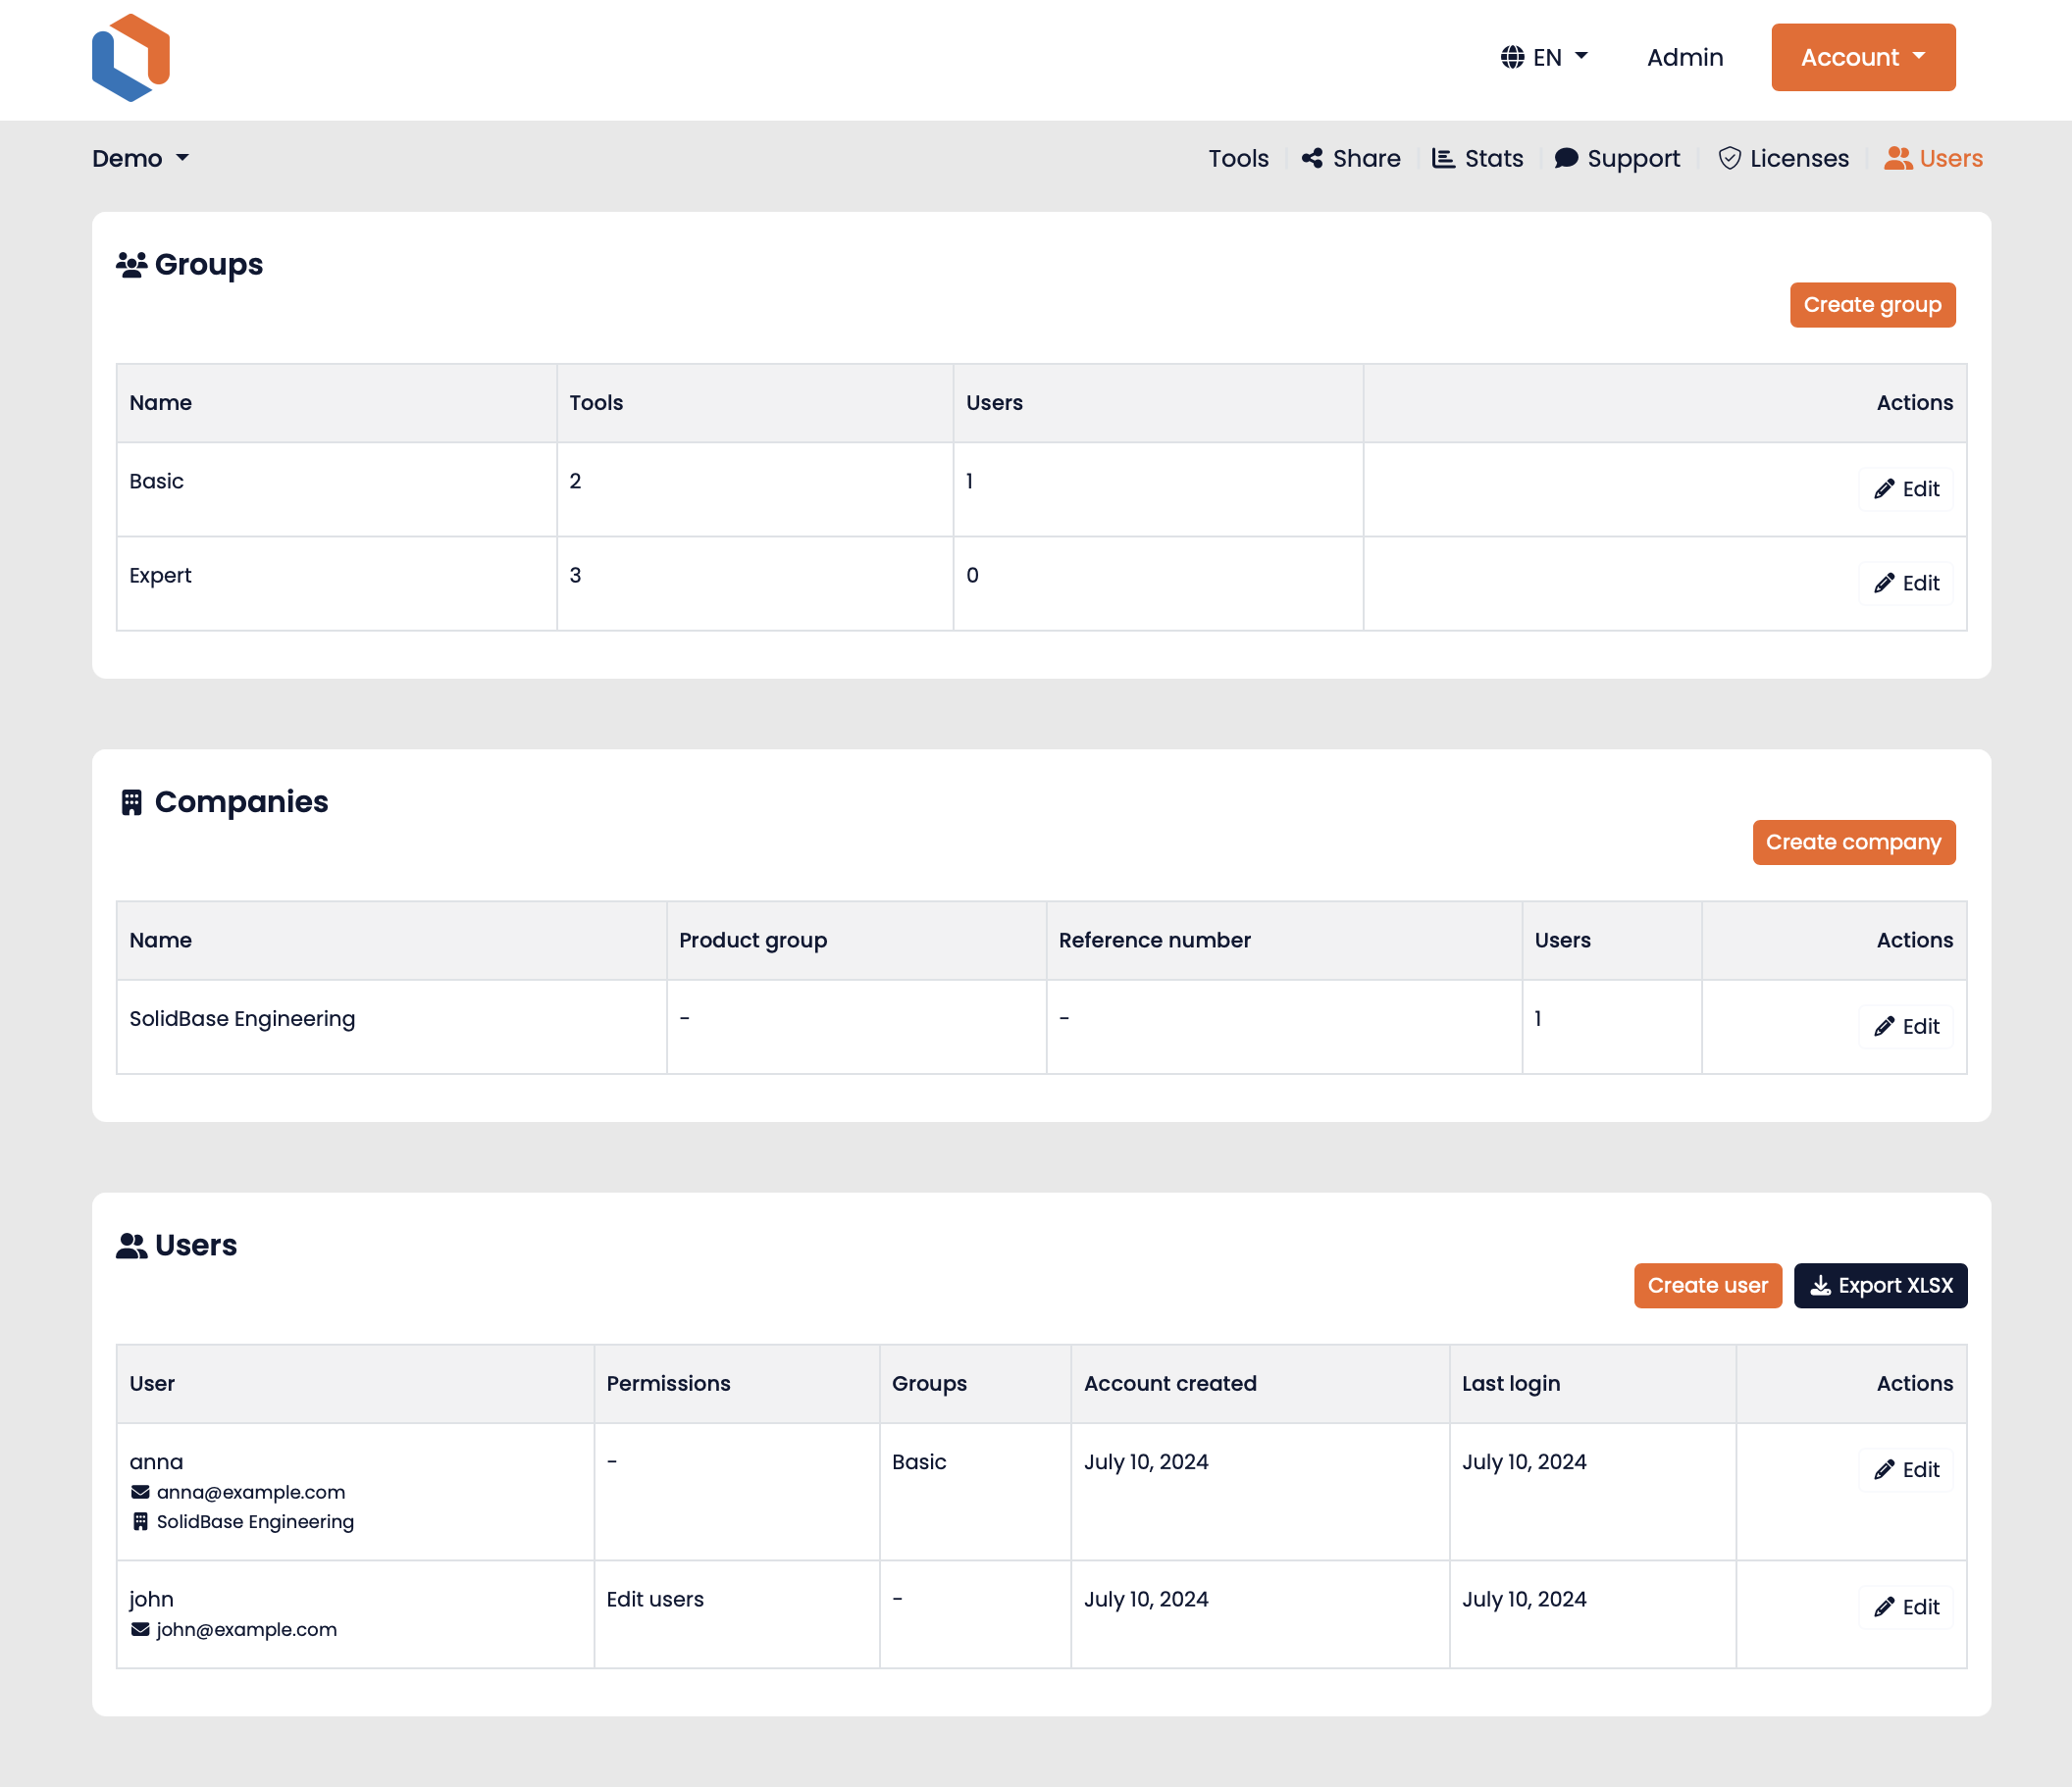
Users and authorization
Access to tools within the Py-Engineering platform is controlled through a flexible authorization system that supports multiple levels of access. Below is an overview of how user access is managed and granted.
Tool Access Control
Access to a specific tool is determined by several conditions:
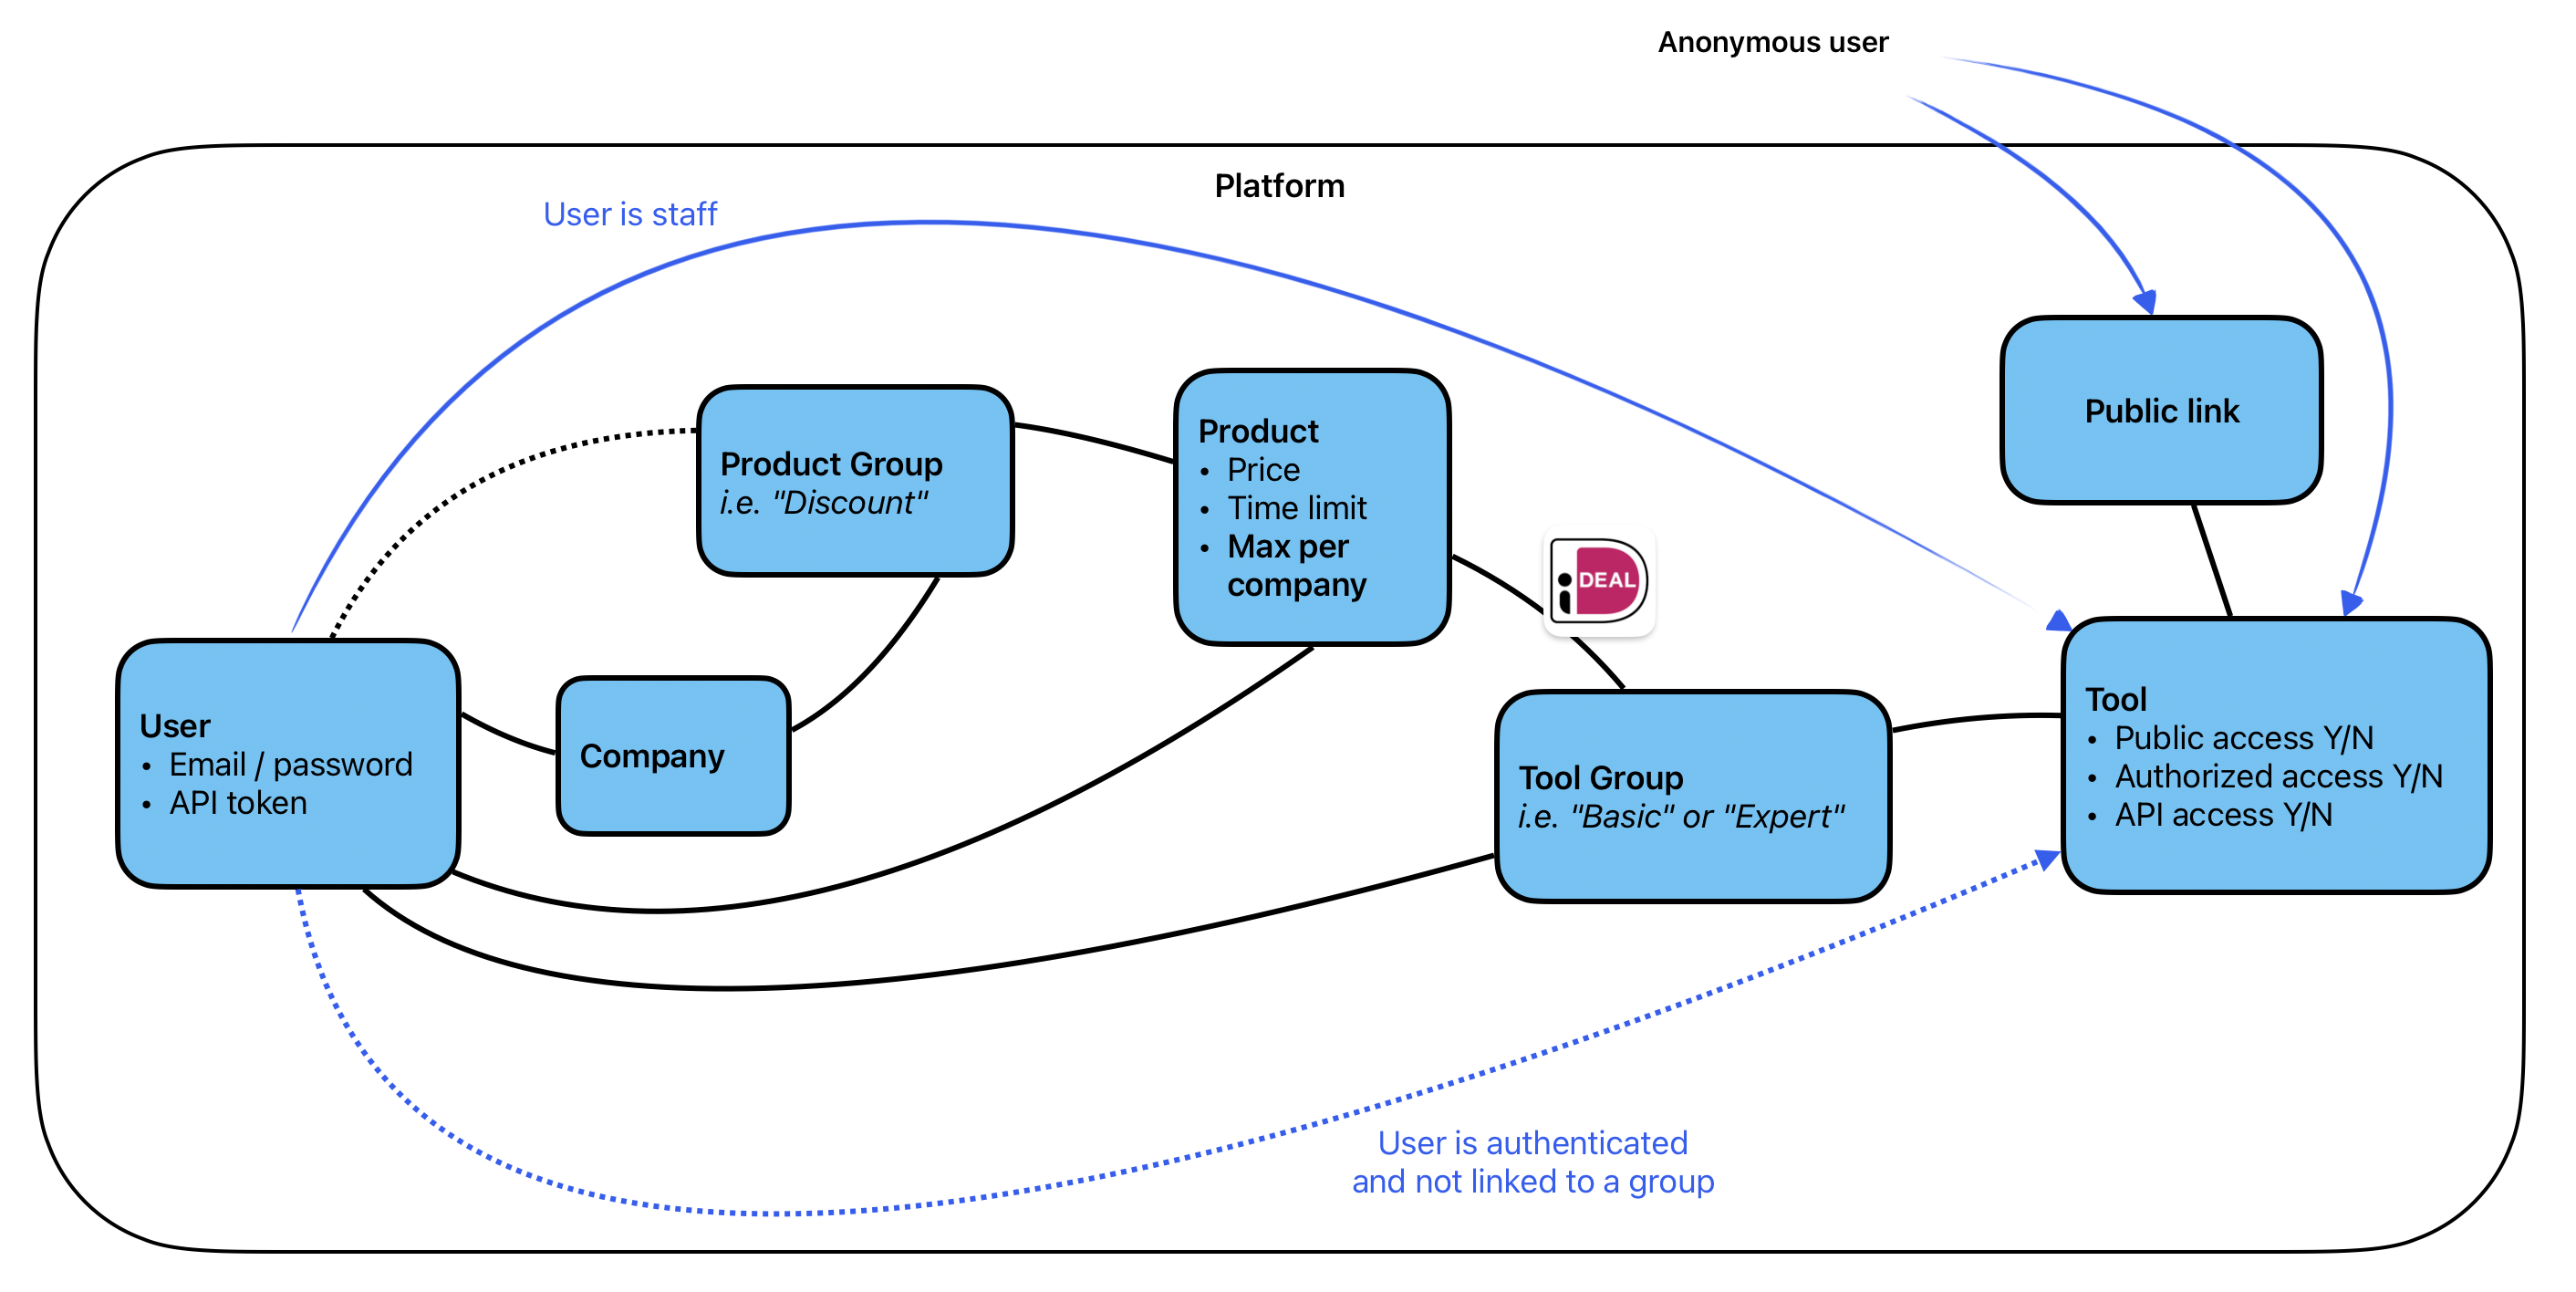
- Staff Access: Staff users automatically have access to all tools within their platform.
- Product Licenses: Users can gain access through active product licenses. If the tool belongs to a calculation group linked to one of the user's active products, access is granted.
- Tool Groups: Users can be explicitly assigned to tool groups. If the platform is configured to restrict access via tool groups only, then the user must belong to a group that includes the desired tool.
- Public Tools: Tools can also be made publicly available through a public link, allowing unrestricted access.
- API Access: For programmatic use, tools can be exposed via the API, enabling access through an API token assigned to the user. This is useful for integrations or automated workflows.
Additionally, if group-based access control is not enforced on a platform, users may receive access even without explicit group assignment.
User Management and Product Configuration
Authorized administrators can assign users to specific tool groups, which determine their access to collections of tools. They can also configure products that users can purchase (e.g., via iDeal payment or by invoice) to gain access to specific tool sets.
If user registration is allowed on a platform, default tool groups or product groups can be defined. Newly registered users are automatically assigned to these groups, enabling immediate access to associated tools or products without manual intervention.
Monitoring
Keep track of tool usage and platform activity with real-time logging and statistics.
API
Each tool in Py-Engineering can easily be made available as an API. This allows calculations and analyses to be performed without using the web interface.
The API functionality is documented in the OpenAPI specification. API calls require an access token to be included in the header. Example in Python using the requests module:
import json
from pprint import pprint

import requests

api_key = ''  # YOUR API KEY
platform_uuid = ''  # Examples
calculation_uuid = ''  # Tutorial 01: Basic example

base_url = 'https://py-engineering.com/api'
my_headers = {'Authorization': f'Bearer {api_key}'}

# Calculations
calculations_url = f'{base_url}/calculations?platform_uuid={platform_uuid}'
calculations_response = requests.get(calculations_url, headers=my_headers)
pprint(calculations_response.json())

# Calculation
calculation_url = f'{base_url}/calculation?calculation_uuid={calculation_uuid}'
calculation_response = requests.get(calculation_url, headers=my_headers)
pprint(calculation_response.json())

# Calculate
calculation_url = f'{base_url}/calculate'
data = {
    "calculator_uuid": "3ecb9ca8-1d66-4ef4-814f-42cfd8835f58",
    "calculator_in": {
        'a': 3,
        'b': 4,

    }
}
calculate_response = requests.post(calculation_url, headers=my_headers, data=json.dumps(data))
pprint(calculate_response.json())
The API supports several endpoints, including:
/api/calculations– Retrieve available calculations/api/calculate– Perform a calculation/api/calculation-logs/{calculation_log_uuid}– Retrieve log data
The input for calculations (calculate) is specific to each tool and can be found on the API page for that tool.

By default, the validation script and output as PDF are not executed through the API call. If desired, these functionalities can be enabled by including additional parameters in the POST data.
More details on the API functionality can be found in the OpenAPI documentation.